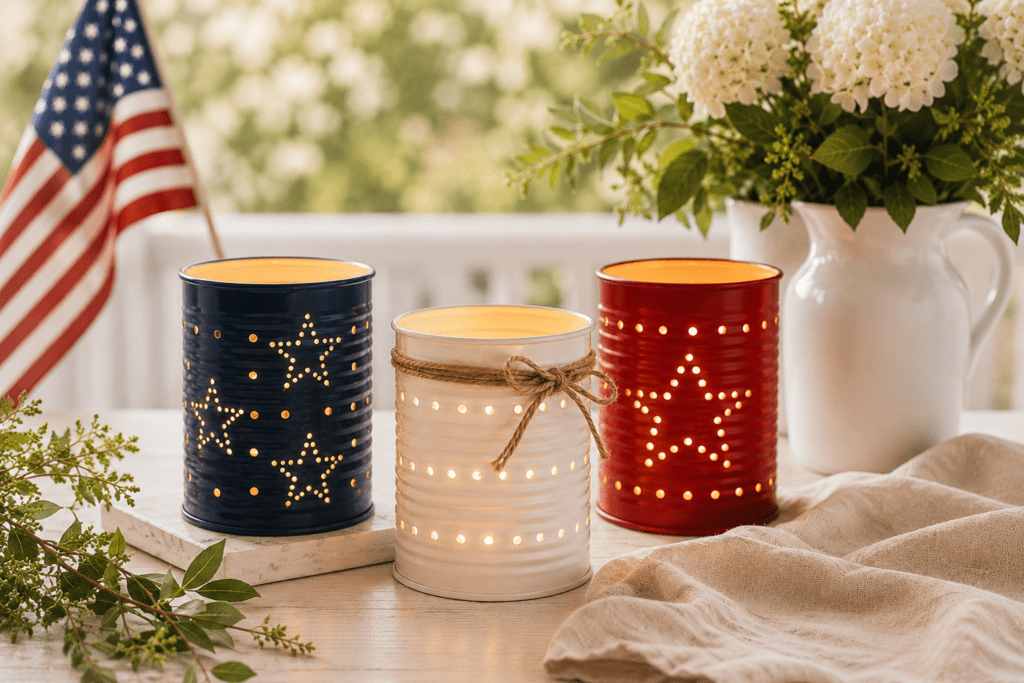
Here’s the thing about the best summer projects: they don’t require a trip to the craft store or a complicated set of instructions. These DIY patriotic luminaries are made from tin cans you probably already have in your recycling bin, and they look like something you’d find on a carefully curated Pinterest board. Red, white, and navy with glowing star cutouts? Yes, please.
Line them down your front walk, cluster them on the porch, or set them up as a centerpiece on your outdoor table. However you use them, they’re going to look amazing once the sun goes down.
What You’ll Need
- Clean, empty tin cans (various sizes look great together!)
- Spray paint in red, white, and navy
- A nail and hammer (try a few different nail sizes if you want to create more intricate designs)
- A permanent marker
- A small towel or piece of scrap wood
- Tea light candles or battery-operated tea lights
- Optional: twine for wrapping
Step 1: Prep Your Cans
Remove the labels and wash the cans thoroughly. Fill them with water and freeze them solid. This is the trick that keeps the can from denting while you punch your design. It takes a few hours, so plan ahead and pop them in the freezer the night before.
Step 2: Plan Your Design
While your cans are freezing, sketch out your pattern on paper. Stars are the obvious (and perfect) choice for the Fourth, but you can also do simple dot borders, stripes of dots, or a mix of both. When you’re ready, use a permanent marker to draw your design directly on the frozen can. Work quickly so the ice doesn’t start melting.
Step 3: Punch Your Pattern
Place the frozen can on a folded towel or piece of scrap wood to keep it steady. Using your nail and hammer, punch holes along your design lines. Space them close together for a fuller glow, or further apart for a more defined outline. Don’t rush this part. The more intentional you are, the better it’ll look lit up at night.
Step 4: Let It Thaw
Once you’ve finished punching, let the ice melt completely and dry the can out. Give it a good hour or two before moving on.
Step 5: Paint
Spray paint your cans in your chosen colors. Two light coats work better than one heavy coat. It’ll go on more evenly and dry faster. Let each coat dry fully before adding the next. For the white can, a coat of white primer first will help the color pop.
Step 6: Add the Finishing Touches
Once the paint is fully dry, tie a length of twine around the middle of any can you want to dress up a little extra. It adds a cozy, handmade touch that looks great against the painted metal.
Step 7: Light Them Up
Drop a tea light into each can and watch them glow. Battery-operated tea lights are a great option if you’re setting these up on a wood surface or anywhere near little ones. All the ambiance, none of the worry.
Pro Tips
- Mix your sizes. Large vegetable cans, medium soup cans, and smaller tomato paste cans create a really nice layered effect when grouped together.
- Don’t skip the freeze. Skipping this step is the fastest way to end up with a dented, misshapen can.
- Make extras. These go fast and look even better in multiples. A set of nine or twelve lining a walkway is absolutely worth the extra afternoon.
These luminaries store flat in a bin and come back out year after year, which means this is a one-weekend project that keeps paying off every Fourth of July.